Programming for ESP8266 (Part 1)
ESP8266 is a game-changer chip. It provides WIFI functionality for as low as 5 $ when all competitors at the time we offering their chips for 30 $ or more. It is very small in size. In addition it has serial connectivity, Real Time Clock(RTC), General Programmable Inputs and Outputs (GPIO) and Analog to Digital Converter (ADC). But that is not the thing that makes a lot of people in the ameteur Internet Of Things world so excited. It is the possibility to program this chip and use your imagination to build your very own smart Thing.
In this article we will help you get started in setting up a development environment and creating your first Hello Real World application for ESP8266.
In part 1 of the article we will prepare the development environment and buy the needed hardware.
Development Environment
In order to set up a development environment we will use Vagrant together with Virtualbox. Vagrant will create the virtual machine for us. It will also provide the needed settings, toolchains, etc and Virtualbox will run this machine for us. For simplicity the instructions below are for Ubuntu 14.04 but you can apply them to other distributions or Operating Systems(OS).
Vagrant
Go to the Vagrant’s download page and choose the latest version. I am using 64bit version therefore I have chosen to download this URL: https://dl.bintray.com/mitchellh/vagrant/vagrant_1.7.2_x86_64.deb
You can run the following commands to install Vagrant on your machine
 cd /tmp

wget -c https://dl.bintray.com/mitchellh/vagrant/vagrant_1.7.2_x86_64.deb

sudo dpkg -i  vagrant_1.7.2_x86_64.deb
Once you are ready you should go to the next step which is installing VirtualBox.
VirtualBox
Go to the VirtualBox’s download page and get find the package for your distribution/OS. In my case I downloaded Virtualbox from this URL: http://download.virtualbox.org/virtualbox/4.3.26/virtualbox-4.3_4.3.26-98988~Ubuntu~raring_amd64.deb.
The commands to install it on your computer are given below.
cd /tmp

wget -c 'http://download.virtualbox.org/virtualbox/4.3.26/virtualbox-4.3_4.3.26-98988~Ubuntu~raring_amd64.deb'

sudo dpkg -i 'virtualbox-4.3_4.3.26-98988~Ubuntu~raring_amd64.deb'
For our purposes Virtualbox should be able to access the USB devices. Usually if you running as a non-root user that is not the case. In order to check if your Virtualbox has access to the USB devices, please run the following command:
VBoxManage list usbhost
If you do not get an output similar to this one:
Host USB Devices:
UUID: c031bc0f-406d-4960-ae7b-218a2534e22f

VendorId: 0x046d (046D)

..

Current State: Busy

...
Then you have to add your current user to the vboxusers group. This can be done with the following command:
USERNAME=`whoami`;

sudo useradd -G vboxusers $USERNAME
To test if you are now able to access the USB devices from your virtualbox you should open a new terminal and from there run
VBoxManage list usbhost
This time you should see a list of available USB devices.
Now that we have Vagrant and Virtualbox we can use a pre-made template for creating our Development virtual machine.
Dev Box
Go to the directory where you do your development. And from there run the following command to download the new virtual machine template.
git clone https://github.com/slaff/esp8266.dev.box.git

cd esp8266.dev.box.git
There are two important files in that directory. The first is called Vagrantfile and it describes how our new virtual machine will be created. The second important file is called vm-bootstrap.sh and this one describes to download, install and seupt the software that we will be using. In vagrant terms this is known as “provisioning”.
In order to create our development box we need to run the following command:
cd <path-to>/esp8266.dev.box.git

vagrant up
When you run vagrant up for the first time it will take more than an hour. Vagrant will download the base box, then it will download the esp-open-sdk and try to create a compiler toolchain. And finally it will try to download and compile NodeMCU, Micro Python and Frankenstein-ESP8266 platforms for our programming pleasure.
While we are waiting for our Dev box to be generated we can buy the needed hardware.
Device
 There are a lot of ESP8266 modules out there. You can choose the whichever you want. The development box that we are building should work for most of them.
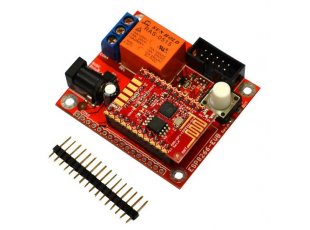
For this article I have chosen to use Olimex’es ESP8266 Evaluation Board. Mainly due to its ease of use and due to the fact that we can start using it almost immediately without the need to solder something. Please note that you might need to buy also 5V adapter like SY0605E, and USB-Serial-Cable-F to connect ESP8266-EVB to your computer.
The Olimex ESP8266-EVB module has in addition a push button and power relay that we will use later on. If you have already bought ESP8266 module you should be able to apply our examples also to your module.
That is for part 1. Make sure that you have all needed hardware and software set up before you move to part 2 of this article.
In part 2 of this article we will compile a simple Hello Real World application for the ESP8266. We will use the C programming language so brush up your C knowledge and get ready for the second part.
Bart
Is it possible to unplug the ESP8266 module from the board, and use the board to program other MOD-WIFI-ESP8266-DEV modules?
admin
Yes, you just need to gently remove the module from the board. You just need one board and you can reprogram as much MOD-WIFI-ESP8266-DEV modules as you want.
Khalid Sakib
I am getting an error:
The box you’re adding has a name different from the name you
requested. For boxes with metadata, you cannot override the name.
If you’re adding a box using `vagrant box add`, don’t specify
the `–name` parameter. If the box is being added via a Vagrantfile,
change the `config.vm.box` value to match the name below.
Requested name: chef/ubuntu-14.04
Actual name: bento/ubuntu-14.04
Khalid Sakib
I changed FROM -> config.vm.box = “chef/ubuntu-14.04” TO config.vm.box = “bento/ubuntu-14.04”. It was started installing/set-upping.
Bur at the end of installation I got:
==> default: wget is already the newest version.
==> default: Some packages could not be installed. This may mean that you have
==> default: requested an impossible situation or if you are using the unstable
==> default: distribution that some required packages have not yet been created
==> default: or been moved out of Incoming.
==> default: The following information may help to resolve the situation:
==> default: The following packages have unmet dependencies:
==> default: build-essential : Depends: gcc (>= 4:4.4.3) but it is not going to be installed
==> default: Depends: g++ (>= 4:4.4.3) but it is not going to be installed
==> default: libtool : Depends: cpp but it is not going to be installed
==> default: E
==> default: :
==> default: Unable to correct problems, you have held broken packages.
The SSH command responded with a non-zero exit status. Vagrant
————–
gcc, g++ is not going to be installed!!!!!! it is one of the (may be the most) important part. Is it expected? what to do? 🙁
Slavey Karadzhov
Seems like the chef/ubuntu-14.04 image was replaced with a newer one. I can check later this week if I am getting the same error. Meanwhile you can write directly the creators of the image about the issues that you are facing.
Slavey Karadzhov
Khalid, I changed the base box from “chef/ubuntu-14.04” to the officual “ubuntu/trysty32”. Get the latest version of the provisioning scripts( https://github.com/slaff/esp8266.dev.box.git ) and give it a try.
Ivan Tarozzi
Add missing packages to vm-bootstrap.sh, in the line starting with “sudo apt-get -y install…..”
I added followings packages and it works:
cpp gcc g++ libtool-bin
Tucson Tom
I don’t understand why you use a virtual machine if you are already running linux (you say Ubuntu).
I have had no trouble installing the toochain directly on my 64 bit Fedora system and I can’t imagine it would
be any different on Ubuntu.
admin
For the same reason people use Virtual machines: namely to isolate the tools and application that you have and group them logically.
Tester
Hey I was wondering if all of this is possible on a win7 host machine? It is not clear to me what he is intalling where? On the host on the virtual box, it is a bit confusiing, Can someone enlighten me please?
Tim
My host environment is Windows 7. I already have VirtualBox running a virtualized Ubuntu 14.
I’m unclear on how Vagrant and Virtualbox relate. On the Vagrant page, it shows downloads for Windows and Ubuntu.
I could install the Windows version of Vagrant, but it might interact with my existing Virtualbox and several virtual machines there (including Ubuntu).
On the other hand I could use the instructions above and install Vagrant inside the Ubuntu VM already running in Virtualbox. But again, there is the possibility of interactions?
Does anyone have any advice?
Slavey Karadzhov
> I’m unclear on how Vagrant and Virtualbox relate.
Vagrant is the tool that automates the creation of the Virtual Machine VM ( in this case using Virtualbox to host and run the VM)
> I could install the Windows version of Vagrant, but it might interact with my existing Virtualbox
If you mean that it might change your existing VMs – then that won’t be the case. Vagrant will create a new VM and in it will run the provisioning scripts to install the toolchain and needed software. This also means that if you already have Ubuntu VM you can log in to that one and try to run the provisioning scripts inside of it.
Tim
Realizing there probably won’t be any response here in the near term, I started down the path of installing inside the Ubuntu environment. It does not seem to have the USB access though.
tim@MARS-VirtualBox:~$ VBoxManage list usbhost
The program ‘VBoxManage’ is currently not installed. You can install it by typing:
sudo apt-get install virtualbox
tim@MARS-VirtualBox:~$ sudo apt-get install virtualbox
____snip___ installation process____________
tim@MARS-VirtualBox:~$ VBoxManage list usbhost
Host USB Devices:
tim@MARS-VirtualBox:~$ sudo useradd -G vboxusers tim
[sudo] password for tim:
useradd: user ‘tim’ already exists
tim@MARS-VirtualBox:~$ VBoxManage list usbhost
Host USB Devices:
Not sure where to go from here…..
PS – really annoying: “Error: Time limit is exhausted. Please enter CAPTCHA value again.”
Tim
Note in the previous post, the response after “Host USB Devices” has been stripped out.
It is None. (surrounded by GT and LT symbols that are presumably stripped)
Vlad
Try:
sudo VBoxManage list usbhost
emember
Toolchain build is broken because python-dev is not provisioned.